
The Kawasaki Cam Chain Tensioner is considered by Kawasaki not to be rebuildable, however we have supplied springs for thousands of rebuilds without issue.
There appear to be 2 general modes of failure.
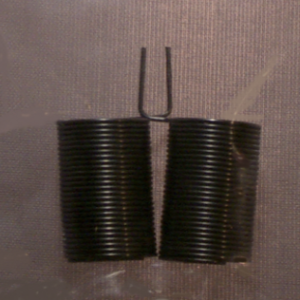
1) The spring breaks or becomes weak.
2) The Cam Chain stretches beyond the limit of the tensioner, thereby rendering the tensioner ineffective
We have developed a spring replacement that solves the first problem. Rebuilding the tensioner is not very difficult with our Ultimate Rebuild kit. Given that replacement of these springs occur well into the life of the bike, we have made these springs about 15% stiffer than stock to account for the fact that they will most likely be used when the tensioner will not be fully compressed. TOC Manufacturing recommends that you replace the ACCT springs every 2 to 3 years.
The TOC Manufacturing Ultimate rebuild kit includes 2 springs, one for each ACCT; 4 O-rings, 2 for each ACCT for the front and real seals; and the Ultimate ACCT Rebuild key. After years of development, this key allows you to easily and properly rebuild your ACCT.
Instructions:
Rebuilding the Automatic Cam Chain Tensioner is fairly straightforward.
After removing the ACCT from the bike, remove the cir-clip that secures the plunger to the body. A pick or dental tool works well for this. After removing the parts from the body of the ACCT and laying them out in order, they should look something like this:

At this point, remove the old spring and replace it with the new spring. The ends of the spring will fit into the slot in the threaded rod and the groove on the inside of the ACCT body. Replace the re-assembled components into the body of the ACCT as shown below, ensuring you align the bend in the spring with the notch in the ACCT body:

Now comes the difficult part! The spring should be preloaded (We recommend 1 full turn of pre-load) before the plunger assembly is screwed in. This is where the manual dexterity is needed.
 To preload the spring, insert the TOC Manufacturing Ultimate Rebuild Tool into the back of the ACCT. Turn the screw 1 turn clockwise, then lock the Tool by inserting the shoulder of the Tool into the body of the ACCT.
At this point you need to screw the threaded rod into the plunger, without losing the preload on the spring. To do so, properly orient the three tabs of the plunger to the body of the ACCT, then, back out the Key so the shoulder is disengaged, and continue to turn the key, retracting the plunger into the ACCT body.
Three (3) things to keep in mind:
1) Be sure and check the orientation of the tabs on the plunger before you start to screw the threaded rod into it. The 3 tabs are not the same size and there is only one correct orientation.
2) Have the spring clip resting on the plunger below the rounded end and above the retaining tabs. This will make it much easier to secure the spring clip in its groove once the retaining tabs are seated.
Once the plunger is threaded and fully retracted, continue to turn the Rebuild Tool clockwise – this will give you the flexibility to align the three retaining tabs with their respective notches in the body of the ACCT. Once these tabs are in their notches, reinsert the spring clip into its groove.
3) Once the ACCT is fully assembled and the spring is allowed to decompress, the plunger should reach full extension with the rounded end approximately one inch beyond the retaining clip. You should not be able to push the plunger back into the body of the ACCT if the rebuild is done properly.
That’s all there is to it! To re-install on the bike, the plunger must be compressed. To do this, use the Rebuild Tool to wind up (retract) the plunger lock it into place while re-installing it on the bike.
Reviews
There are no reviews yet.